Hi there! Today on color combos with Crystal we are going NEON color schemes.
The technique? We are water coloring with Distress Oxides on a heat embossed image. Stay tuned to see up close photos and a full video tutorial at the end.
The stamp sets used are from Unity are Hearts All Over Background Stamp and Sentiment "Blossom Thoughts & Wishes "
The water coloring medium is Distress Oxide picked raspberry, twisted citron, wild honey, and spiced marmalade.
Start by heat embossing in white the HEARTS ALL OVER BACKGROUND STAMP, with white embossing powder.
Then to watercolor, we are going to place the actual pad onto the waterproof surface. Grab the color with a water brush and place on the white embossed image.
For the sentiment, BLOSSOM THOUGHTS & WISHES" on the lime green cardstock with white heat embossing.
Hi, there friends! Today I have a very fun and unique way to create your own background using very BASIC supplies and some amazing background stamps from Unity. This DIY cardmaking technique is a brilliant way to extend the use of any background stamp.
Enough telling you about it, let me show how to make this.
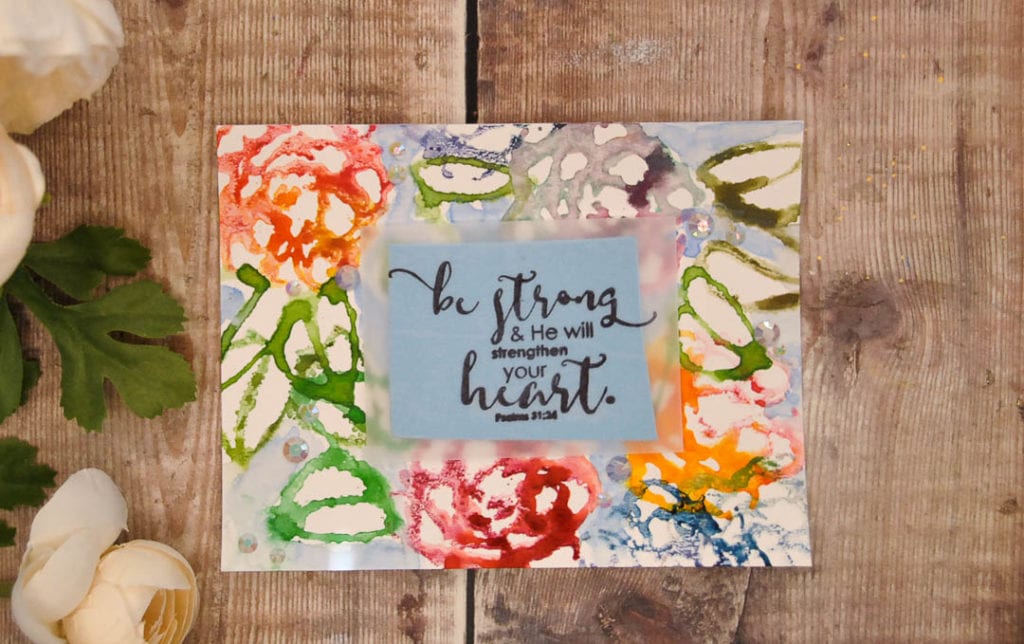
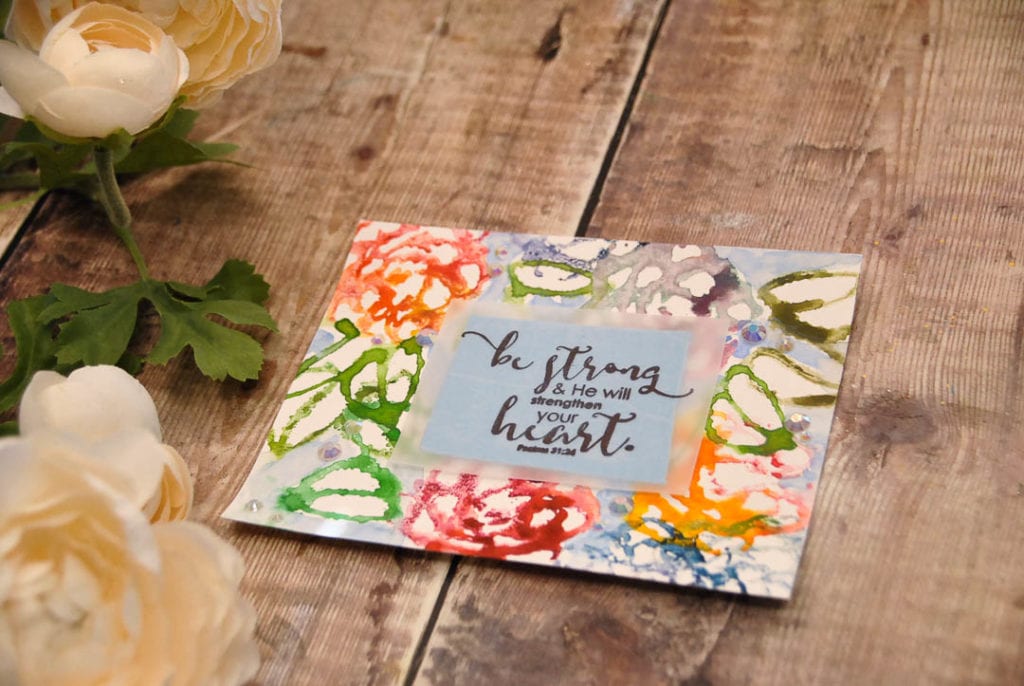
The color inspiration is very basic, simple rainbow hues minus the purple. For the stamp, I am using Unity Stamp Co. Baby Boy Plaid.
To begin, I have my card panel precut from Neenah 110lb cardstock. Next using 5 colors of distress oxydes and a round brush I blended circular ink circles. I got about 3 to fit on each row.
I repeated this process all the way down until I covered the entire card base. Then, I splattered water on the entire thing so it reacts with the Distress Oxydes. Allow time to dry before moving on to the next step.
Now we will heat emboss the BABY BOY PLAID stamp set with white embossing powder, heat set with your heat gun. While that cools off, on a piece of Black cardstock stamp and heat emboss the "YOU can do it " from the THANKFUL & GRATEFUL FALL.
Then hand cut the sentiment around the edges. Once that is done, with foam adhesive place the sentiment over the plaid background. Finish up with some clear embellishments or sequins.
I have a full tutorial video showing you the entire process on this awesome DIY background.
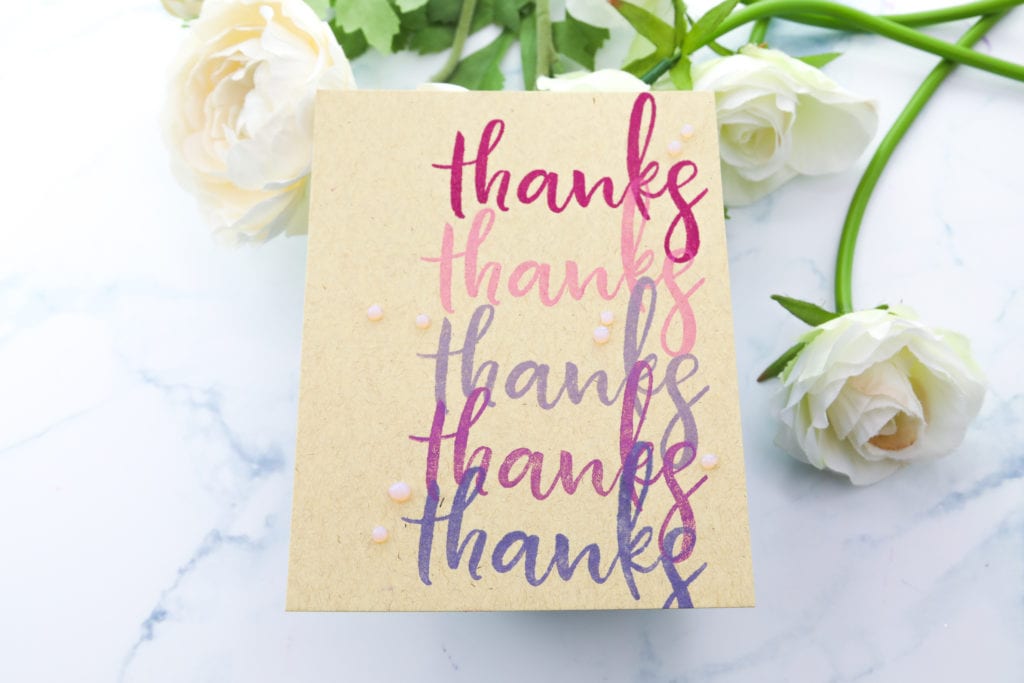
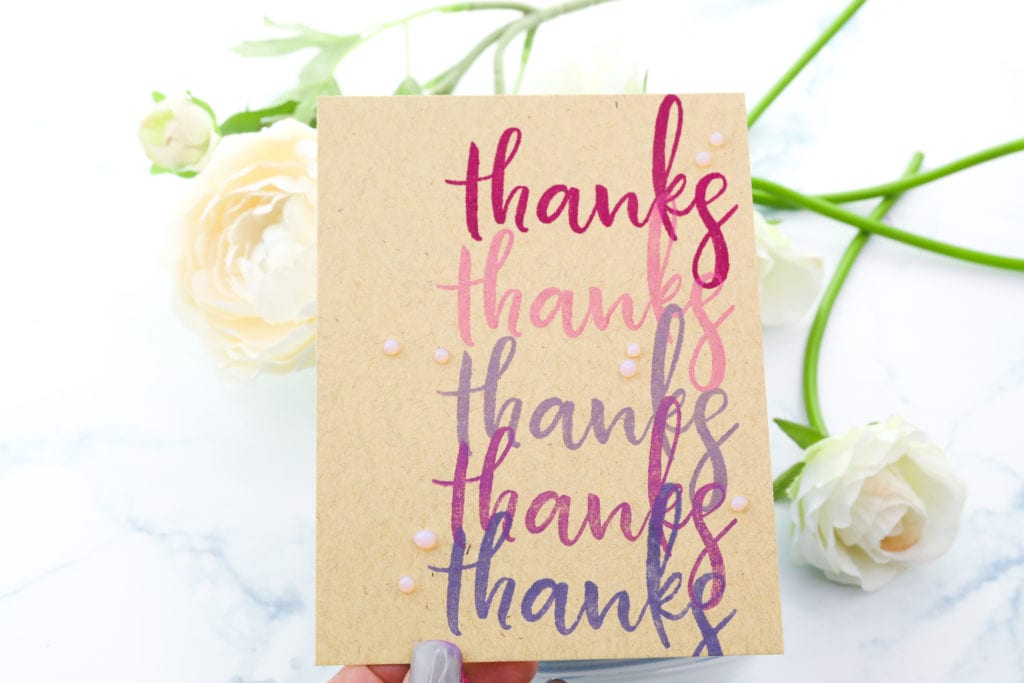
Hi, there friends! Welcome to my Color Combos with Crystal as we will be creating a gorgeous Clean and Simple card on Kraft using Chalk Ink.
The color combinations for this was from an array of purples inspired by this gorgeous Color Palette photo found on Pinterest.
Super pretty right?! Once I found my color combo, I thought it would be best to stamp with Chalk Ink, as it creates such a clean and bold impression on darker card stock. I am using the Clearsnap Colorbox Chalk Inks. For the stamp set, I am using one of my favorites, OBSESSIVELY GRATEFULwhich is absolutely versatile to any occasion.
To begin this card panel, I have my kraft cardstock trimmed to 4.25 x 5.50. Beginning at the top with the hot pink and coming down the line with the other ink colors, slightly overlapping the letters.
I do want to give you a quick tip that Chalk Ink does take a bit longer to dry, so that is why I started at the top since there can be smudges if starting from the bottom, then going up.
The card was embellished with Nuvo Drops in TONIC NUVO TRANSLUCENT PERIWINKLE.
My ideas was not to embellish so much that it took away from the simple stamping.
Of course, I have a made a FULL tutorial video with real-time stamping so you can see how easy and effortless this clean and simple card truly is.
Clean and Simple Tutorial HERE:
Thank you so much for joining me today on this gorgeous almost summer Tuesday. Hope you enjoyed this quick inspiration and quick tutorial.
Cheers!
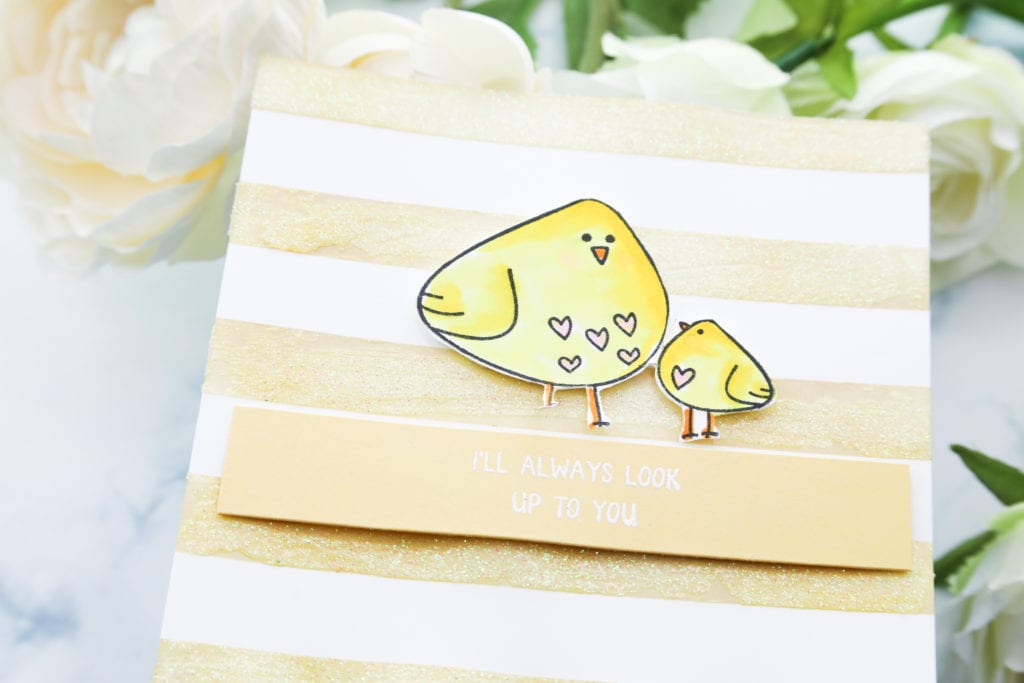
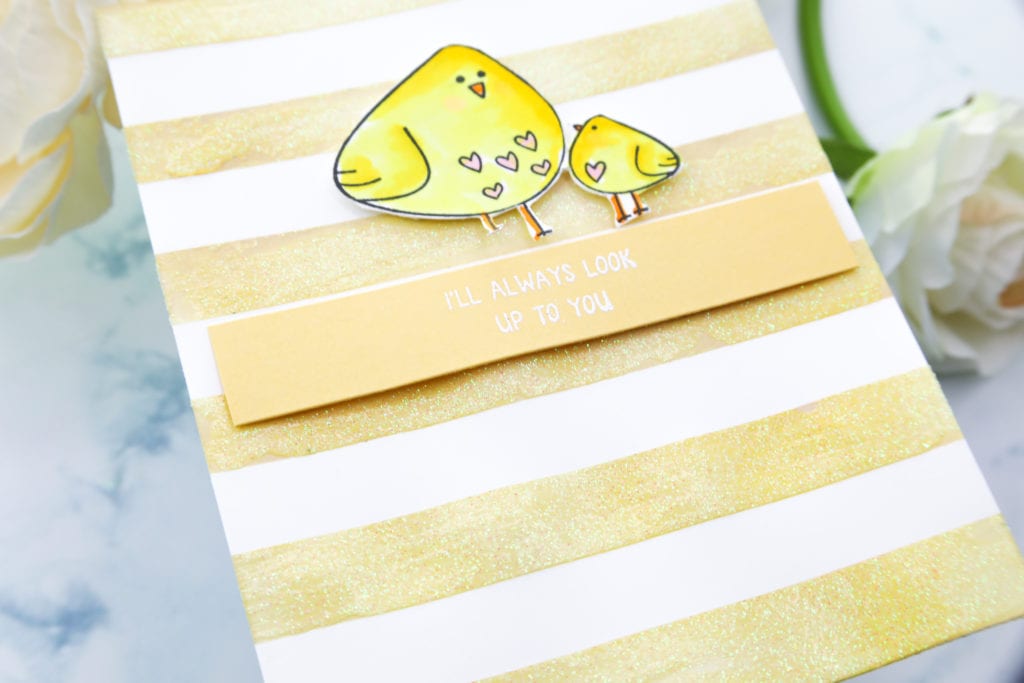
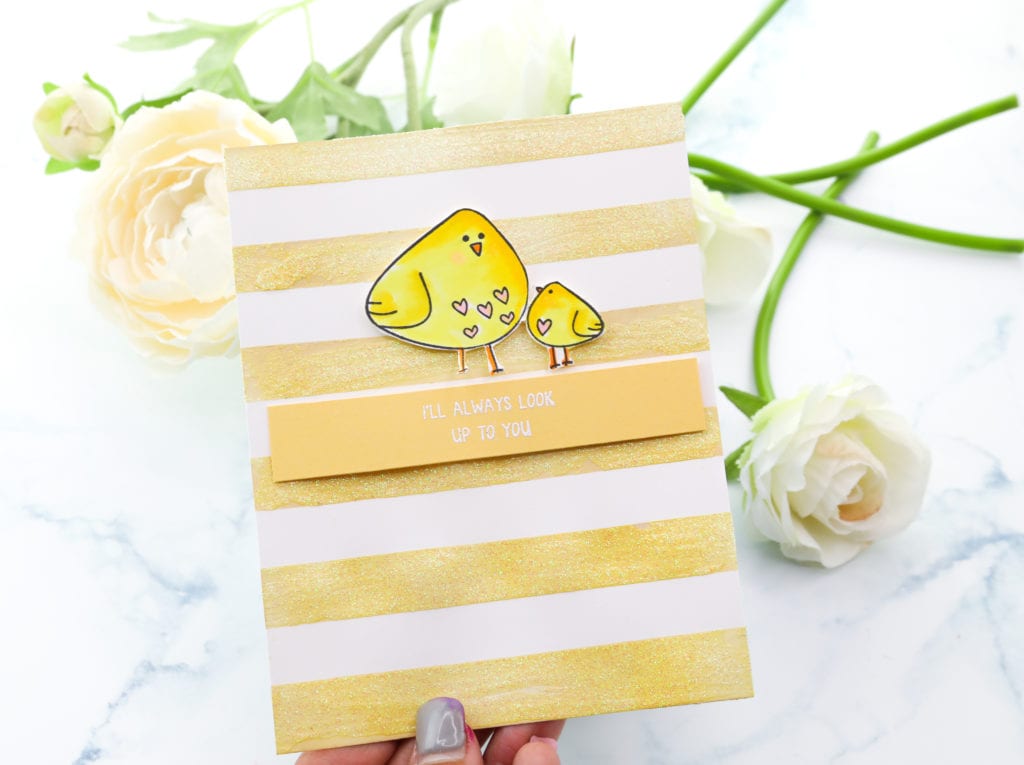
Hi there! Today we have a clean and simple Mother's Day card with a DIY Background using some ink and Glitter Nuvo drops.
The color combination for this is simple yellow tones and white. Nothing says Spring like a soft tone.
The stamp is an oldie but a goodie. Look Up To You Birdies.
I began by stamping, coloring and hand cutting the birds from Look Up to You Birdies, added foam adhesive and set aside.
Then with purple tape, I masked several stripes and blended the non-masked parts with yellow Distress Oxyde. Once that was dried up, I used my Nuvo Drops in Crystal Glitter and rubbed some of the stuff over the same yellow. With a spatula I spread the entire thing, then removed the purple tape.
Allowing time to dry, I set that aside and stamped the sentiment with clear ink and covered with white embossing ink. Once that was nice and cool I cut a strip.
To finish the card off, I added the birdies and the sentiment. The whole card took only about 5 minutes. Check out my real time video below showing you how to make this step-by-step.
https://youtu.be/kiCrDk2bRuU
Thank you so much for joining me today.
Crystal mothers day cards, mothers day cards easy, mothers day cards ideas, mothers day card diy, mothers day cards handmade, mothers day cards 2019, mothers day cards to make, mothers day card ideas, mothers day card easy,
Hi there! Welcome to my stop of the Evelin T Designs new launch blog hop. You should have arrived here from Kelly's blog. I have 3 cards for your viewing pleasure, along with 2 giveaways. One from the Blog Hop and One from Me.
Before that let me show you what I made.
First Up is the Evergreen Foliage
I did some quick repetative stamping in 5 colors and finished up with simple pearls
For my second card using the Sneaky Kitties stamp set:
This one was made with a quick Distress Oxide blends, water and Zig clean color water coloring on the cute little kitties.
Last but not least I have a birthday bear from Coffee Loving Critters
This sweet guy was colored with Copics and the background was stenciled the glitter dipped edges.
GIVEAWAY:
One lucky person will stand a chance to win a $25 gift certificate, all you have to do is hop along each stop & leave a comment along the way to be entered to win! You have until Sunday, May 12th at 11:59pm PST to leave a comment. For extra chances to win, please leave a separate comment on this post letting us know that you just followed us on Instagram, Facebook and YouTube.
Winners will be posted on the GIVEAWAY PAGE on Monday, May 13th. You must check this page & claim your prize within 2 weeks.
GIVEAWAY FROM ME:
Up for grabs is 2 Evelin T Design stamp sets + crafty supplies. To win you must go and follow my YouTube channel. For extra entries be sure to follow me on Instagram too!
Winner will be posted on my Instagram stories on 5-10-19.
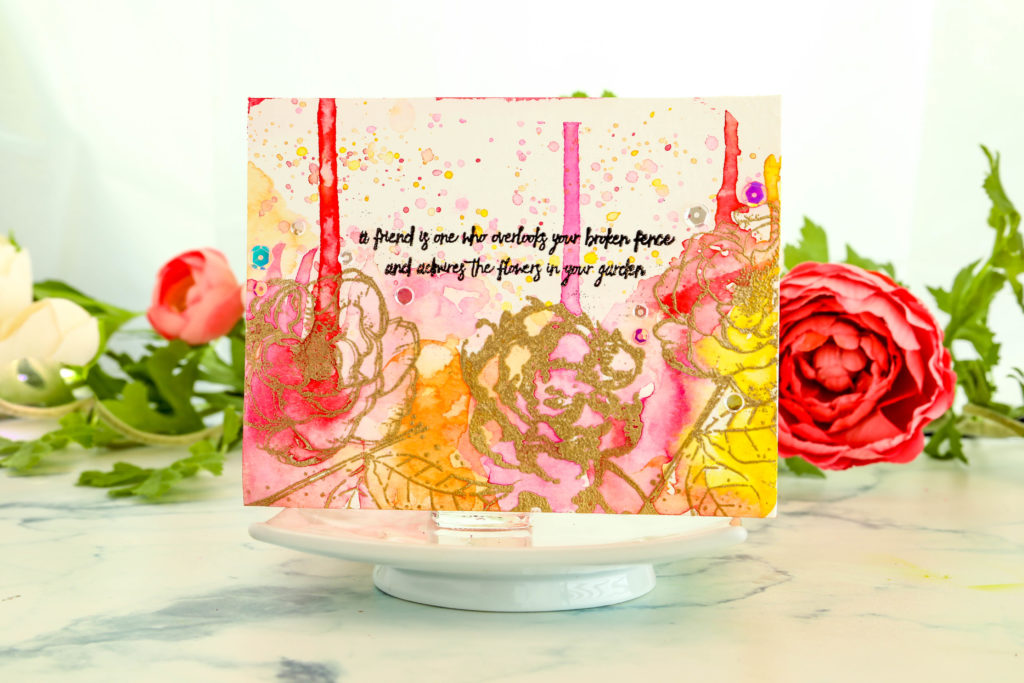
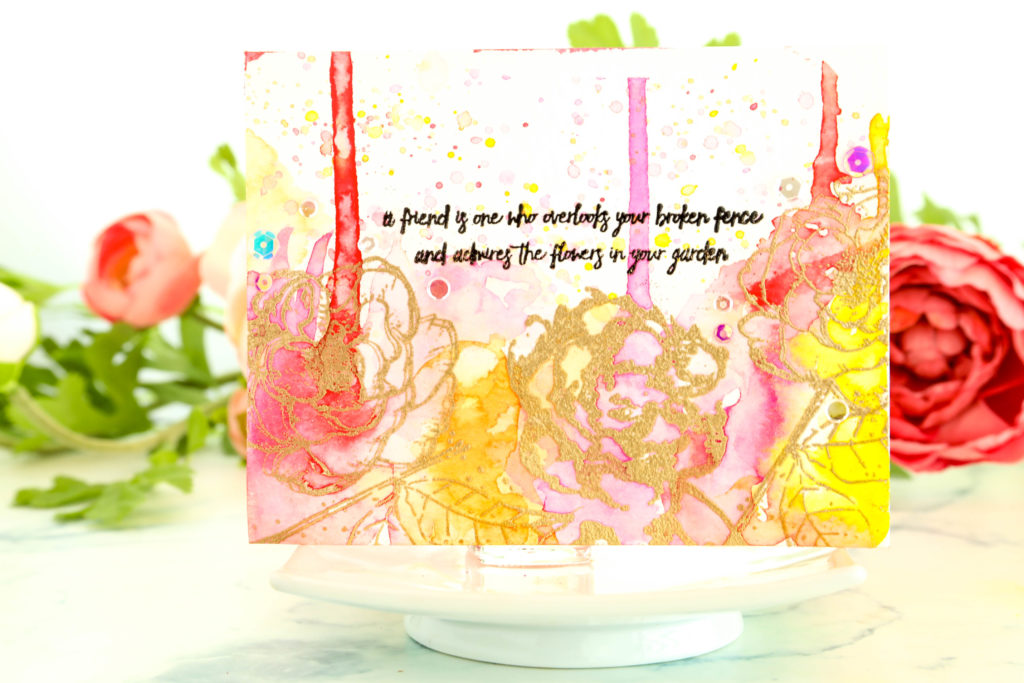
Hey guys, Crystal Thompson here for Color Combos with Crystal. Today, we are going to a create a faux alcohol ink effect. I am in love with all that alcohol ink colours and patterns. But guess what, I don’t have it in my budget to do it.
So, let’s start this tutorial.
Here’s what you will need to do this faux alcohol ink effect:
Step Up Peony florals stamp set.
Water color paper
Liquid water colors - Two shades of Pink, Orange and a Yellow. You can also use a water coloring pad, water coloring chalk or whatever you’ve got available.
Embossing Powder - Black and Gold.
Water Brush
Let’s get started!
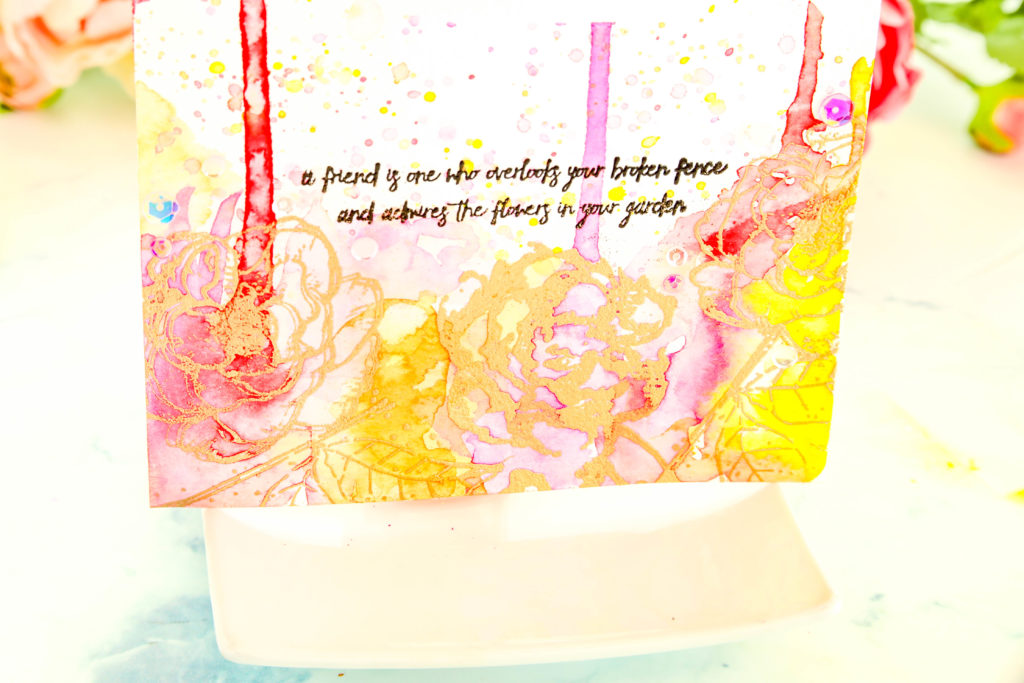
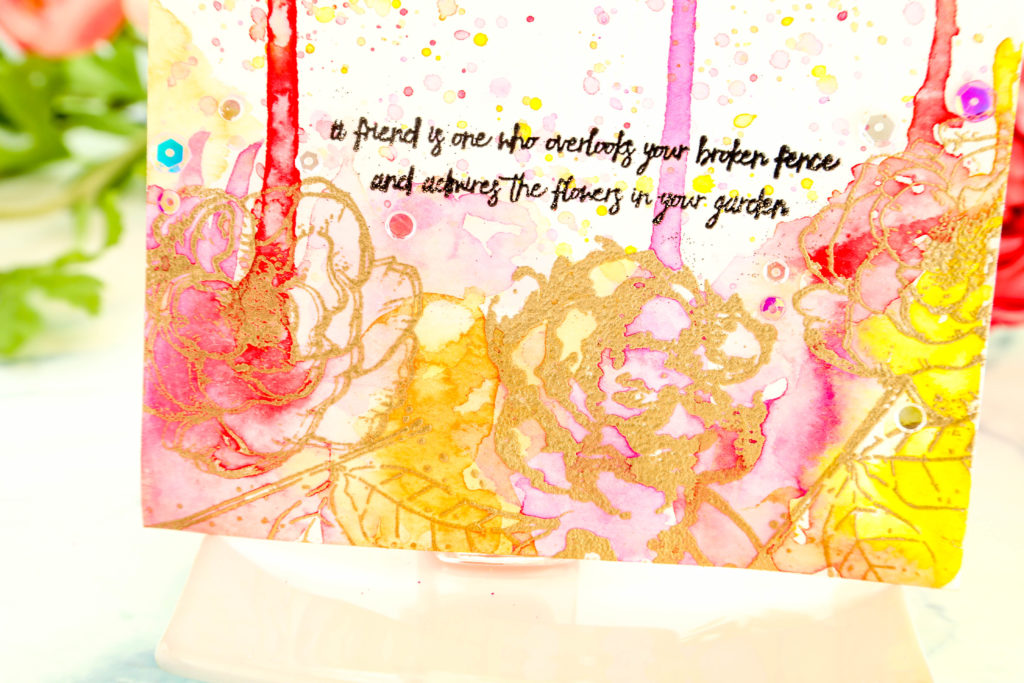
To start, we first need to heat emboss the sentiment from the Step Up Peony set. It’s a gorgeous sentiment that says “ A friend is one who overlooks your broken fence and admires the flowers in your garden.” So I thought, that’s a really pretty and encouraging stamp set to use.
Once we are done with stamping the sentiment with black embossing powder, we’re gonna do one of the largest peony and cover it with gold embossing powder. I usually stamp with my ink first and put the embossing powder and then heat set before I move on. So I do three at a time, and I haven’t had any issues with my powder going over my wet ink. Next, we’re gonna do the leaves for the bottom using gold embossing powder as well, then heat set it. I don’t want to go any further with the stamping because I want to focus with the sentiment and make it really pop out.
Now that we have it completely heat embossed, we are going to bring out our liquid watercolors or any water color that you have will work as long as they are super pigmented. I’m gonna then adhere my cardstock to my surface and I’m using a plastic-ky surface. So, I’m gonna do the top then I’m gonna do the color and add water with my brush and drip the colored water to the top. Next, I’m going to do the next color while trying not to blend the colors. And we’re going to repeat the process with all my different colors. And like I said I am using 2 different shades of orange and pink and a yellow. If it doesn’t work like you thought, you can add more water. Just remember to try to avoid the colors from touching each other.
The idea here is that it’s going to be really pigmented and as they dry and you layer them over when they dry, it’s gonna look really pretty. So this is how it’s going to look like once it dries. You get those splotchy, big blobs of color that is really popular with the alcohol ink.
I really like this effect and this is a great way to get some of that effect. Remember, it is important that you use watercolor paper so that the colors can soak. Once that you’ve let those watercolors set on your cardstock, you can see those gorgeous colors. It’s really pretty. We will then grab a piece of paper towel and we’re gonna clean that gold embossing because it’s going to resist the watercolors.
And that does it! A gorgeous faux alcohol ink effect that easy to do. Thanks so much for joining me today.
Hey guys, Crystal Thompson here for Simon Says stamp. Today, I am creating with the gorgeous April 2019 Hello Darling Card Kit. We’re doing four embossing cards with soft colors.
x
To begin we are doing gorgeous color layering of paper. You’re going to need only the contents of your kit for this card.
So, let’s get started!
We’re gonna be using the gorgeous flower pots and and flowers from the stamp set. This is called Hello Darling in 6x 8. We’re gonna three pieces of embossing cardstock. We’re gonna need the Simon Says stamp Clear Embossing and Watermark Ink, the Altenew Mocha and Simon Says Stamp in Green Apple and Rose Apple ink.
For the first card, we’re gonna begin watermarking one of the flower pots with the flowers with the clear ink. By doing this, it’s going to watermark that gorgeous sea glass embossing cardstock. It’s a bit difficult to see as it dries but you will see it a little bit later, it really pops up. This a a great way of making a pattern background without taking anything away from your focus.
For the second layer of your paper, we’re gonna do some of the rose apple pink on the white embossing cardstock . We’re gonna do two layers of these little dots. These little dots are included in the Hello Darling Stamp Set.
Okay, so now for the focus of your card, we’re gonna be making a flower pot with these flowers in individual color. First, we’re gonna ink up the gorgeous flower pot with the Altenew Mocha, then do the leaves in Green Apple, then stamp it a little bit over the flower pot. It will blend in really nicely.
Now, each flower is gonna be a different color. We’re going to begin with the Hot Lips for our first flower, moving on to Blue jay for the second flower, and use the Pale Blush Pink for the third flower.
Once those are done, we’re gonna go ahead and cut around it. I’m gonna cut the interior because I really want those flowers to stick out. And that’s what it looks like, once you’ve detailed cut everything. Absolutely so cute card stamping!
So now, let’s begin with our card. Using the cotton candy embossing cardstock, we are going to be layering. We’re gonna place our first layer of the white, put the white down with flat adhesive, then put the sea glass cardstock on top the white using a foam adhesive . Then, I’m gonna add the flowers that we just stamp.
Now, we’re gonna start a strip sentiment using the Altanew Mocha, we’re gonna be stamping the Thinking of you on to another piece of that cotton candy embossing cardstock. We’re gonna cut the strip and place it on the card . Remove some of the excess and then for a finishing touch, we’re gonna be using Teal Tonic Bohemian Nuvo Vintage drops included in your kit. So, that’s card one.
Moving on to card 2, we’re gonna be using some of the pattern papers included in the kit. No coloring, just basic stamping for the basic sentiments.
You’re going to need the Hello Darling 6x8 and we’re gonna be using the sentiment. I have pre-cut the paper from the Simple Story Spring Farm House 6x8 paper pad. We’re also gonna be using the coordinating farm house stickers, Pale Blush Pink ink, some embellishments, and embossing cardstock in craft and white, and foam adhesive.
So we have cut one of the paper by 5 ½ and 4 ¾ then we’re gonna add a strip of kraft cardstock. Create another strip of the checked paper, tear off the edge to make it look a little shabby. Using the Pale Blush Ink, we’re gonna stamp the sentiment from kit, tear off the edge of the sentiment strip too, add some adhesive and place it over the checked pattern.
Now, we’re gonna be using one of the stickers from the Simple Story Farm House. We’re gonna add a strip of foam adhesive to raise it up. It’s gonna match the pattern paper, then we’ll stick at the top.
Last but not the least, we’re gonna be using some embellishments. You can use Nuvo drops . I’m using the pretty pink posh jewels and adding some glue on to my card and adding those embellishments. This is a super fun way to use those gorgeous pattern papers.
Alright, down to card 3! We are going to be doing a gorgeous stamping of Hello Darling . It’s a large stamp and I really wanted to feature it in a very simple, rainbow ombre card, that is clean and simple. You’re gonna need a white embossing cardstock and the following ink colors , Altanew Crisp Dye Ink Bamboo, Simon Says Stamp Malibu, Pale Blush PInk, Hot Lips. You’re alos gonna be using the Bohemian Drops Nuvo Teal included in your kit.
So, let’s get started! We are actually gonna place the stamp on to a stamp positioner because I want it to be really really dark. We’re gonna begin with the Pale Blush Pink on the corner, come in with our next darkest color, then for the bottom of the Hello Darling we’re using the blue and yellow. I like to clean in between my layers, especially when adding more. Look at how nice those blends are.
Then, we’re gonna add foam adhesive to the back of the embossing cardstock and place on top of another embossing cardstock. For some finishing touch, we’re gonna be adding some of the Bohemian Nuvo Vintage Teal drops on to the edges and embellish the circles from the stamp set. This is a simple and clean card, you can totally mass produce this . But it’s so colorful even though it’s clean and simple.
We are down to card 4. Our next card is another simple and clean creation using the same color coordination from the Hello Darling Card Kit. We’re gonna need the Sending Sunshine Your Way sentiment along with the flowers from the Hello Darling Stamp Set included in your kit. We’re gonna need the following colors of ink, Pale Blush Pink, Malibu , Hot Lips, some clear embossing powder. We’re gonna need white embossing cardstock and the sea glass embossing cardstock. We’re gonna embossing powder in Gold, gold sequins , gold thread and your Bohemian Teal Nuvo Drops.
We’re gonna begin by stamping the sentiment on to the sea glass embossing cardstock, with clear embossing ink and cover that up with Simon Says stamp gold embossing powder, remove the excess and heat set with your heat gun.
For the gorgeous flora pattern for the back, we’re gonna be using the Pale Blush Pink and the Malibu. I am using my strip that I had just embellished, use it as a guide as to how far do I need to go down. That way I’m not wasting time on stamping paper that’s not gonna be seen yet I’m not leaving some empty spots on my embossing cardstock. I’m gonna stamp those florals with those two colors then coming in with our Hot Lips using one of those smaller flowers and stamping all over the other flowers that I had just stamped on.
I’m gonna be using my tumble, adding two little lines of adhesive, come in with my gold thread and add those, doing a circle motion. This is just gold embroidery thread available at any of your favorite craft store. We’re gonna add a little bit of foam adhesive on the sentiment strip and add that down. For my additional gold embellishments, I have added a couple of drops of glue to add those gold sequins and placing them all over the bottom and top of the stamping. Last but not the least, I am adding a couple of drops of that Tonic Bohemian Nuvo Drops included in your kit.
And that does it! I hope you these four cards, totally spring using this Simon Says Stamp April 2019 Hello Darling Card Kit.
Happy Tuesday! Today we creating a bright and happy card by stamping using our Unity stamps and a palette of watercolors!
This is a super easy way to create a watercolor look card, with watercolors without actually having to be too careful about the proper shading.
For today's project I am using Gansai Tambi watercolor palette. For the florals I am working Step Out Peony and for the sentiment I have got I am with you stamp set.
Since I am super impatient about ink drying time, I did use a black permanent ink on the vellum.
This is seriously super easy! Here is the full tutorial video. The one tip I should mention is don't use too much water when inking up the stamp with your watercolors. Make more of a paste like consistency.
https://youtu.be/mUPO11bvPCs
Super easy right?! If you don't have colored foam, you can use cardstock then place the foam adhesive on the back.
Hi ya! Today I am making a TON of clean and simple cards with basic supplies that are easy to mass produce! I am using the Simon Says Stamp Limited Edition Valentines 2019 Card Kit. I am only using a portion of what is included in the kit, so there is still a good amount left of product to use in your Valentine making.
If the kit sells out, you can still get most of the items individually.
For a closer look:
Supplies for these cards:
The Sweetest Stamp Set: http://shrsl.com/1f4x6
Love Notes Stamp Set: http://shrsl.com/1f4x8
Pebbles Quotes: http://shrsl.com/1f4xd
Tim Holtz Distress Oxyde: http://shrsl.com/1f4xh
Links above are affiliate links, if you purchase anything from the above, I receive a small commission at no extra cost to you. Thank you for your support
Thanks for stopping by today! I appreciate you and your time!
Crystal